Difference between revisions of "Community Photos"
Jump to navigation
Jump to search
m (Added links to User Roles page) |
m (Updated links) |
||
| Line 12: | Line 12: | ||
[[File:AddCommunityPhotosButton.png|right|frame]] | [[File:AddCommunityPhotosButton.png|right|frame]] | ||
<h3 style="display: inline-block; background:#ffffff; font-weight:bold; border-bottom:2px solid #6093cc; text-align:left; color:#000; padding:0.2em 0.4em;">Adding Community Photos</h3><br /> | <h3 style="display: inline-block; background:#ffffff; font-weight:bold; border-bottom:2px solid #6093cc; text-align:left; color:#000; padding:0.2em 0.4em;">Adding Community Photos</h3><br /> | ||
You can add Community photos if you are a [[User Roles|user with the role of Group Communicator, Group Caregiver or Group Admin]] (or above) for groups that are in the Community. The photos must be located on your computer, or on a device that is attached to your computer, such as a flash drive or camera. To add Community Photos: | You can add Community photos if you are a [[User Roles and Privileges|user with the role of Group Communicator, Group Caregiver or Group Admin]] (or above) for groups that are in the Community. The photos must be located on your computer, or on a device that is attached to your computer, such as a flash drive or camera. To add Community Photos: | ||
* Click the "Manage Communities" button on the Dashboard. | * Click the "Manage Communities" button on the Dashboard. | ||
* Select the appropriate Community. | * Select the appropriate Community. | ||
| Line 22: | Line 22: | ||
<h3 style="display: inline-block; background:#ffffff; font-weight:bold; border-bottom:2px solid #6093cc; text-align:left; color:#000; padding:0.2em 0.4em;">Deleting a Community Photo</h3><br /> | <h3 style="display: inline-block; background:#ffffff; font-weight:bold; border-bottom:2px solid #6093cc; text-align:left; color:#000; padding:0.2em 0.4em;">Deleting a Community Photo</h3><br /> | ||
Community photos can be removed by any [[User Roles|users who have the role of Group Communicator, Group Caregiver or Group Admin]] (or above) for groups that are in the Community. To delete Community photos: | Community photos can be removed by any [[User Roles and Privileges|users who have the role of Group Communicator, Group Caregiver or Group Admin]] (or above) for groups that are in the Community. To delete Community photos: | ||
* Click the "Manage Communities" button on the Dashboard. | * Click the "Manage Communities" button on the Dashboard. | ||
* Select the appropriate Community. | * Select the appropriate Community. | ||
Revision as of 20:56, 26 November 2013

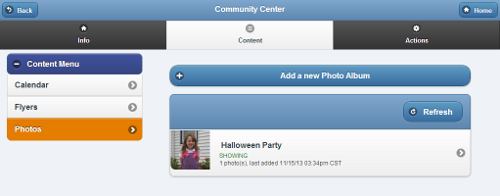
Community Photos Screen
 |
OverviewCommunities can share photos from community events with all the members of the Community. Residents can browse the photos on their touchscreen, and see them displayed in their slide show. |

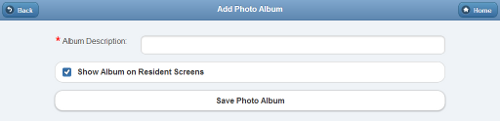
Adding a Community Photo Album

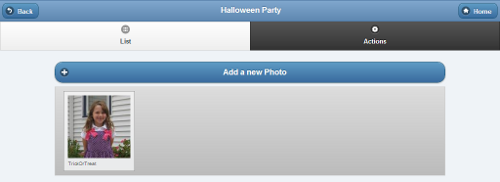
Adding a Community Photo

Adding Community Photos
You can add Community photos if you are a user with the role of Group Communicator, Group Caregiver or Group Admin (or above) for groups that are in the Community. The photos must be located on your computer, or on a device that is attached to your computer, such as a flash drive or camera. To add Community Photos:
- Click the "Manage Communities" button on the Dashboard.
- Select the appropriate Community.
- Click the "Content" tab.
- Click the "Photos" button.
- All photos must be in an album. Select an album, or add a new one.
- Click the "Add a new Photo" button.
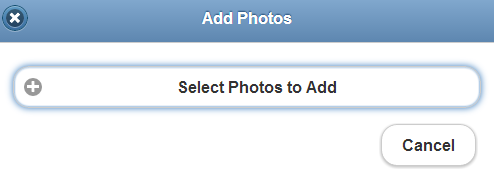
- Click the "Select Photos to Add" button, then select the photos.
Deleting a Community Photo
Community photos can be removed by any users who have the role of Group Communicator, Group Caregiver or Group Admin (or above) for groups that are in the Community. To delete Community photos:
- Click the "Manage Communities" button on the Dashboard.
- Select the appropriate Community.
- Click the "Content" tab.
- Click the "Photos" button.
- Click the appropriate album.
- Click the photo you want to delete, then click the red "Delete" button.
To delete a Community Photo Album:
- Click on the album you want to delete.
- Click the "Actions" tab.
- Click the red "Delete this Photo Album" button.
Editing a Caption
Community photos have captions that can be seen when the Resident is browing the photos or viewing them in the slide show. By default, the photo caption is the file name. To change the caption:
- Click the "Manage Communities" button on the Dashboard.
- Select the appropriate Community.
- Click the "Content" tab.
- Click the "Photos" button.
- Click the appropriate album.
- Click the photo you want to edit, then type in the new caption below the photo.
- Press "Enter" to save the new caption.