Difference between revisions of "Inovonics Antenna Configuration"
Jump to navigation
Jump to search
| Line 1: | Line 1: | ||
[[File:PeripheralsScreenForZ-Stick.png|right|frame|Peripherals Screen]] | [[File:PeripheralsScreenForZ-Stick.png|right|frame|Peripherals Screen]] | ||
[[File: | [[File:InovonicsPorts.png|right|frame|Choose a Port]] | ||
<h3 style="display: inline-block; background:#ffffff; font-weight:bold; border-bottom:2px solid #6093cc; text-align:left; color:#000; padding:0.2em 0.4em;"><br / | <h3 style="display: inline-block; background:#ffffff; font-weight:bold; border-bottom:2px solid #6093cc; text-align:left; color:#000; padding:0.2em 0.4em;"><br />How to Install an Inovonics Antenna</h3> | ||
At the touchscreen (or for a CoMo box - at the GCTV image): | At the touchscreen (or for a CoMo box - at the GCTV image): | ||
* Insert the X10 antenna into an available port (typically a port on the back of the machine) | * Insert the X10 antenna into an available port (typically a port on the back of the machine) | ||
| Line 11: | Line 8: | ||
* Enter the 4-digit System PIN (which is set, and can be viewed, on the Advanced Settings screen in the [[Care Menu|Care Menu]]) | * Enter the 4-digit System PIN (which is set, and can be viewed, on the Advanced Settings screen in the [[Care Menu|Care Menu]]) | ||
* Press "Peripherals" | * Press "Peripherals" | ||
* On the Peripheral page, the | * On the Peripheral page, the Inovonics antenna is referred to as the "EN4000" | ||
* In the | * In the EN4000 row, choose the port - your choices will be specific to the system hardware | ||
* Press "Turn On" | * Press "Turn On" | ||
* Restart peripherals when prompted | * Restart peripherals when prompted | ||
* If installed correctly, the row will now be highlighted in green. If there is a problem with the installation, the row will be highlighted in red. | * If installed correctly, the row will now be highlighted in green. If there is a problem with the installation, the row will be highlighted in red. | ||
* After it is installed correctly, you can begin to [[ | * After it is installed correctly, you can begin to [[Inovonics Devices|add Inovonics devices]], such as motion sensors, door sensors, etc.<br /><br /> | ||
Revision as of 18:00, 3 August 2012

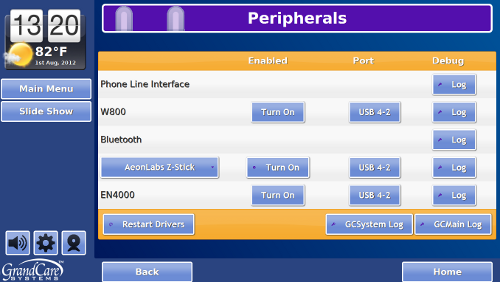
Peripherals Screen
File:InovonicsPorts.png
Choose a Port
How to Install an Inovonics Antenna
At the touchscreen (or for a CoMo box - at the GCTV image):
- Insert the X10 antenna into an available port (typically a port on the back of the machine)
- If using the serial model, plug the antenna into an electrical outlet
- Press the System (Gear) button
- Enter the 4-digit System PIN (which is set, and can be viewed, on the Advanced Settings screen in the Care Menu)
- Press "Peripherals"
- On the Peripheral page, the Inovonics antenna is referred to as the "EN4000"
- In the EN4000 row, choose the port - your choices will be specific to the system hardware
- Press "Turn On"
- Restart peripherals when prompted
- If installed correctly, the row will now be highlighted in green. If there is a problem with the installation, the row will be highlighted in red.
- After it is installed correctly, you can begin to add Inovonics devices, such as motion sensors, door sensors, etc.