Difference between revisions of "Distributors"
Jump to navigation
Jump to search
| Line 11: | Line 11: | ||
* Click the "Manage Groups" button on the Dashboard. | * Click the "Manage Groups" button on the Dashboard. | ||
* Click the "Actions" tab. | * Click the "Actions" tab. | ||
* Click the "Add a new | * Click the "Add a new Distributor" button. | ||
* Enter a name for the | * Enter a name for the Distributor. | ||
:: | ::This is a required field. | ||
* Enter the remaining information. | * Enter the remaining information. | ||
::Note that the email address entered receives alert messages when [[System Status|system status]] for any | ::Note that the email address entered receives alert messages when [[System Status|system status]] for any account member changes to "down" or "up". | ||
::It's recommended to use an email address for an email distribution list as the | ::It's recommended to use an email address for an email distribution list as the Distributor email, rather than an email address for a single person. | ||
* Click the "Save | * Click the "Save Distributor" button.<br /><br /> | ||
<h3 style="display: inline-block; background:#ffffff; font-weight:bold; border-bottom:2px solid #6093cc; text-align:left; color:#000; padding:0.2em 0.4em;">Group Management Features</h3><br /> | <h3 style="display: inline-block; background:#ffffff; font-weight:bold; border-bottom:2px solid #6093cc; text-align:left; color:#000; padding:0.2em 0.4em;">Group Management Features</h3><br /> | ||
Revision as of 21:36, 21 November 2013
  |
OverviewDistributors are organizations that manage multiple Groups of accounts. They may provide technical support, installation assistance, or hardware. Every Distributor must have at least one user with the role of Distributor Admin. |

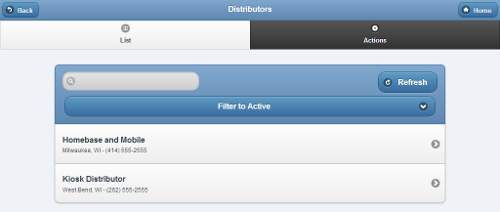
Manage Distributors Screen
Creating a Distributor
Distributors can only be created by users who have a role of Admin. To create a Distributor:
- Click the "Manage Groups" button on the Dashboard.
- Click the "Actions" tab.
- Click the "Add a new Distributor" button.
- Enter a name for the Distributor.
- This is a required field.
- Enter the remaining information.
- Note that the email address entered receives alert messages when system status for any account member changes to "down" or "up".
- It's recommended to use an email address for an email distribution list as the Distributor email, rather than an email address for a single person.
- Click the "Save Distributor" button.
Group Management Features
Groups can be managed by users with the role of Group Admin for the Group, or the role of Distributor Admin of the Distributor for the Group. To manage a Group:
- Click the "Manage Groups" button on the Dashboard.
- Click the Group you wish to manage.
- Click the appropriate tab:
 |
Info Tab - Click the Info tab to view general information about the Group, such as the address and distributor, and a log of Group activity. |
 |
Accounts Tab - Click the Accounts tab to see, and manage, the list of the Accounts in the Group. |
 |
Systems Tab - Click the Systems tab to see, and manage, the list of the Systems in the Group. |
 |
Users Tab - Click the Users tab to see, and manage, the list of the Users with roles that give them access to Accounts in the Group. |
 |
Actions Tab - Click the Actions tab to access the controls for managing a Group. |